Thursday, May 24, 2018


Sunday, August 20, 2017
Hello World to Cloud Computing

Hello World to Cloud Computing
Cloud computing is a new form of Internet-based computing that provides shared computer processing resources and data to computers and other devices on demand.
What are Cloud Deployment Models?
Cloud deployment model refers to how logically grouping is provided to host the contents, it may or may not have exact one to one similarities with physical location.
- Public Cloud
- Owned by commercial company who provides a service to host the contents.
- Private Cloud
- Owned by a company for it's own use and strictly allows access to companies authorized users.
- Hybrid Cloud
- Data center owned by a company which is interacting to the Public Clouds hosted by the Cloud Vendors.
- Community Cloud
- Owned and Managed by a company and setup is for a dedicated community e.g. Bank or Trading company.

- IaaS - Infrastructure as a Service -
- Offering Infrastructure as a service.
- Infrastructure is managed by the cloud vendor.
- Examples are deploying Virtual Machines, deploying servers etc.
- PaaS - Platform as a Service
- Offering Platform as a service.
- Platform is managed by the cloud vendor.
- Examples are Installing database, Installing web servers etc.
- SaaS - Software as a Service
- Software is managed by a vendor.
- Examples are Microsoft Office 365.

Azure supporting Languages
- .NET / JAVA / Python / Node.js / PHP
Steps to write 'Hello World' in Cloud Computing
A. Write a .NET Hello World Application
1. Create a free AZURE account by visiting link https://azure.microsoft.com/en-us/free/ and click on
'Start Free'.


4. Welcome to the World of CLOUD -
After login AZURE Dashboard will be shows as below.

5. To host a services on AZURE you need Virtual Machine and to create a Virtual Machine, you need to create Resource Group. On left pane of the screen click on 'Resource Group' on

6. Click on 'Add' to add Resource Group.

7. Add Resource group name , Subscription and resource group location and screen will look
like following.


C. Deploy Hello World to Microsoft AZURE Cloud
IMPORTANT POINTS IN THIS BLOG
- Install Visual Studio Community 2017 from https://www.visualstudio.com/downloads/- free for developers and students for non-production use, this has most latest API's available for cloud.

- In following window from 'WEB and Cloud' select
- Select 'ASP.NET and web development'
- Select 'Azure development'
- Click on 'Install'

- After finishing installation, Open Visual Studio 2017 community - Click on File - New - Project - ASP.NET Web Application.

- Choose MVC Project and click OK.

- You will get following screen, as you can see MVC Project created with all necessary files and directories.


- Save - Build - and Run the project

- You will see following screen notice address bar this is running on your local IIS Server .

- To give it more Accurate name, change above 'ASP.NET' message to 'Hello World To Cloud Computing' , and optionally change the description with any other details e.g. I have put here pratimas.blogspot.com. Build and keep it ready to publish on Cloud.

- By now you are ready with your .NET Hello World application running on Local Server. In Section B we will see how to setup you FREE AZURE/Cloud 30 day account with $200 credit.


B. Create a AZURE Cloud account
1. Create a free AZURE account by visiting link https://azure.microsoft.com/en-us/free/ and click on
'Start Free'.

2. In order to start a free AZURE subscription, you need to login to your Microsoft account or create new one. If you use your company account and Windows Federal Authentication is already setup, you can directly login using your company email address or you can user your microsoft personal account.
3. You need to give your Credit Care Details for Authorization purpose only . Microsoft does't charge your account unless and until you set it like that .
3. You need to give your Credit Care Details for Authorization purpose only . Microsoft does't charge your account unless and until you set it like that .

3. Following screen will appear which will do Authentication and Authorization with your personal account or companies account using Federal Authentication (https://msdn.microsoft.com/en-us/library/ee517293.aspx).

4. Welcome to the World of CLOUD -
After login AZURE Dashboard will be shows as below.

5. To host a services on AZURE you need Virtual Machine and to create a Virtual Machine, you need to create Resource Group. On left pane of the screen click on 'Resource Group' on
- Resource Group - A resource group is a logical container for Azure resources

6. Click on 'Add' to add Resource Group.

7. Add Resource group name , Subscription and resource group location and screen will look
like following.
8. Provide resource group name, in this example I have used pratimas.blogspotResourceGroup', Subscription choose 'Free Trial' and location to host your service e.g. 'Central India' Location needs to select based on the users of your service to reduce network glitches.
Checked on the box 'Pin to Dashboard' in order to appear resource group tile on your dashboard screen.

9. Click on a 'Dashboard' from the left Pane, and you can see currently created resource group on
right hand panel.
10. By now you are ready with your .NET Hello World application and CLOUD Account using
AZURE.
- In Visual Studio Community 2017 , Open solution explorer - Right Click and click on Publish.

- Following screen will be displayed , click on Create New
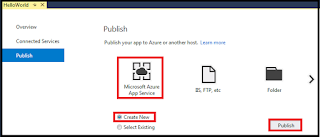
- Select 'Create New ' and provide following details as shown below.
- For App Service Plan click on 'NEW' and provide details as shown below

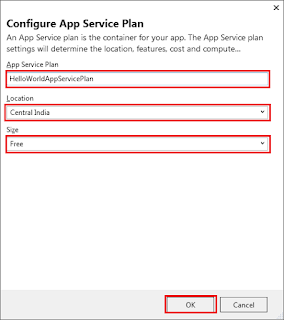
- Following screen will be shown for a fraction of second which shows resources are deploying on CLOUD.

- CONGRATULATIONS you have your first application on Cloud.
 http://helloworldtocloudcomputing.azurewebsites.net/


- Microsoft Visual Studio Community 2017 is FREE and has most latest API to write Cloud computing application. [For non production use]
- Microsoft give 30 day FREE AZURE subscription and $200 Credit to host content.
- Microsoft AZURE Dashboard - portal.azure.com
- .NET Program deployed @ http://helloworldtocloudcomputing.azurewebsites.net/
Sunday, July 31, 2016
Hello World - Your First Extension to .NET Visual Studio 2015 - Open Source
Visual Studio Extension - Hello World
Sometime back I have participated in 3 days session called .NETUNBOXED event where I got a chance to meet with many giants of Open Source platform, Including Microsoft's Project Manager for Open Source team. I learned a lot from them, and thought of writing small hello word program to start on this series.
So, Let's see how to write your first extension for Visual Studio 2015.
You can use any version of visual studio to write your own extensions except Express
System Requirements
1. Visual Studio 2015 (Community / Professional / Enterprise)
2. Visual Studio Development Kit
There are three ways to install Visual Studio Development Kit.
A. Installing VS SDK (Visual Studio SDK) during Visual Studio Installation.
B. Installing VS SDK after installing Visual Studio.
C. Installing VS SDK during project creation. ( This is what I used for my First Application)
A. Installing Visual Studio and Visual Studio Development Kit together
1. Visual Studio 2015 : Any Visual Studio version except express, can be use if available, if not, your can download free Visual Studio 2015 Community version from the following link
Choose 'Community'
2. Make sure you click on 'Visual Studio Extensibility tool' under 'custom tool' to install Microsoft SDK
(Software Development Kit)

2. Visual Studio Microsoft Development Kit :
B. Installing Visual Studio Development Kit after Installing Visual Studio
When you already have Visual Studio installed on your system, you need only Microsoft Software Development Kit to write your own extension for Visual Studio.
1. Click on Control Panel - Programs - Programs and Features - Visual Studio 2015 - Change -

2. You will get following screen. From Select feature, Click on Common Tools - Visual Studio Extensibility tool update 1 (Same as shown in earlier step)
C. Installing VS SDK during project creation.
C. Installing VS SDK during project creation.
1. Open Visual Studio 2015 - File - New - Project
2. From Install - Template - Choose Extensibility

3. If you don't have VSSDK, Visual studio will prompt you to install it.

4. You will get prompted for 'Install Missing Feature' Click on 'Install''

5. You will see a screen to update 'Visual Studio Community 2015', Click on Update.


6. After Few Ok's following screen will get to where you see by default - ' Visual Studio Extensibility Update 3' is already selected for you. Click on 'Next'

Hello World
You are ready to write your first Hello World Extension in Visual Studio.
1. Open Visual Studio 2015 Community.
2. Click on File - New Project - Templates - Visual C#
3. Click on Extensibility to write your first Visual Studio Extention.
4. Choose 'VSIX Project' it stands for 'Visual Studio Installer for Extentions'
5. Name project ' HelloWorld'
6. Click on 'OK'


7. Right Click on the Project - Add - User Control

8. Go Back to Extensibility - Custom Command
9. Name it as 'HelloWorldCommand' and click on 'Add'

10. You will see following screen, which shows command is getting added to the project.


12. Click on 'HelloWorldCommandPackage.vsct'
13. Add 'Hello Wrold' Between 'ButtonText'
13. Add 'Hello Wrold' Between 'ButtonText'

14. Open 'HelloWorldCommand.cs'
15. In 'MenuItemCallback' event replace existing code with following snippet.
private void MenuItemCallback(object sender, EventArgs e)
{
string message = "Hello World";
string title = "My First Visual Studio 2015 Extention";
16. Build And Run
Where your extension will be ?
17. When you build and run, New Visual Studio Experiment instance will be open.
18 Click on ' Tools' and you will see your first ever Visual Studio Extention in Visual Studio 2015.


20 My First Visual Studio Extension - Hello World.

Wednesday, March 16, 2016
Hello World - NServiceBus
It was sunny afternoon in October and Jimmy Bogard who is Chief Architect was right in front of us explaining 'How NServiceBus works'.
Communication is backbone of IT industry and Service Bus is it's nerve system. Though it is relatively new, going further, Service Bus will be important factor in IT industry which will change entire communication architecture
NServicebus is a open source and can be downloaded from http://particular.net/downloads. (Detailed steps are provided below)
NServicebus is a open source and can be downloaded from http://particular.net/downloads. (Detailed steps are provided below)
NServiceBus has following inbuilt capabilities -
- Async Messaging
- Windows Failover Cluster
- Performance Counter
- Detailed Performance Data
- Custom Checks
What you will learn at the end of this blog -
- How to Write Hello World NServiceBus
- NServiceBus Nuget Package
- 1. Download NServieBus open source from http://particular.net/downloads

2. You will get following screen which says
To install NServiceBus core libraries from Nuget, open the Package Manager Console and type
To install NServiceBus core libraries from Nuget, open the Package Manager Console and type
 :
:3. Getting Nuget Libraries in Visual Studio Project
- Open Visual Studio 2015
- Click on File -> New -> Project
- Click on Installed -> Templates -> Windows
- Select Project of type Class Library
- Provide Name - Hello World
- Location to store the project , In this example I have taken 'C:\Blogs\NServiceBus'
- Keep remaining options as it is.

- You will get following screen

Now we need to add NServiceBus.Host and NServiceBus.RavenDB Nuget references in our projects
- Right click on References -> Manage Nuget Packages
- You will get following screen, follow steps mentioned in the scree for both references.

- You can see 'EndpointConfig.cs' is already added in the project.
- Change original program as shown below.
namespace HelloWorld
{
using NServiceBus;
using NServiceBus.Logging;
using NServiceBus.Persistence;
public class EndpointConfig : IConfigureThisEndpoint, AsA_Client,
IWantToRunWhenBusStartsAndStops
IWantToRunWhenBusStartsAndStops
{
public void Customize(BusConfiguration configuration)
{
configuration.UsePersistence<RavenDBPersistence>();
}
public void Start()
{
LogManager.GetLogger("EndpointConfig").Info("Hello Distributed World!");
}
public void Stop()
{
}
}
}
- Click on F5
- You will see following screen

- You have finished your first program 'Hello World' for NServiceBus
Subscribe to:
Posts (Atom)